
A Sales/Service Order (SO) is committed work — either converted from an approved Quote or created directly. It’s where you track fulfillment before billing the client. When the work is done, the order becomes an Invoice.
Where to Find Orders #
Open a client in Client View and click the Sales/Service Orders tab, or use Sales/Service in the main menu. Global Find will also locate an order from anywhere.
The Order List #
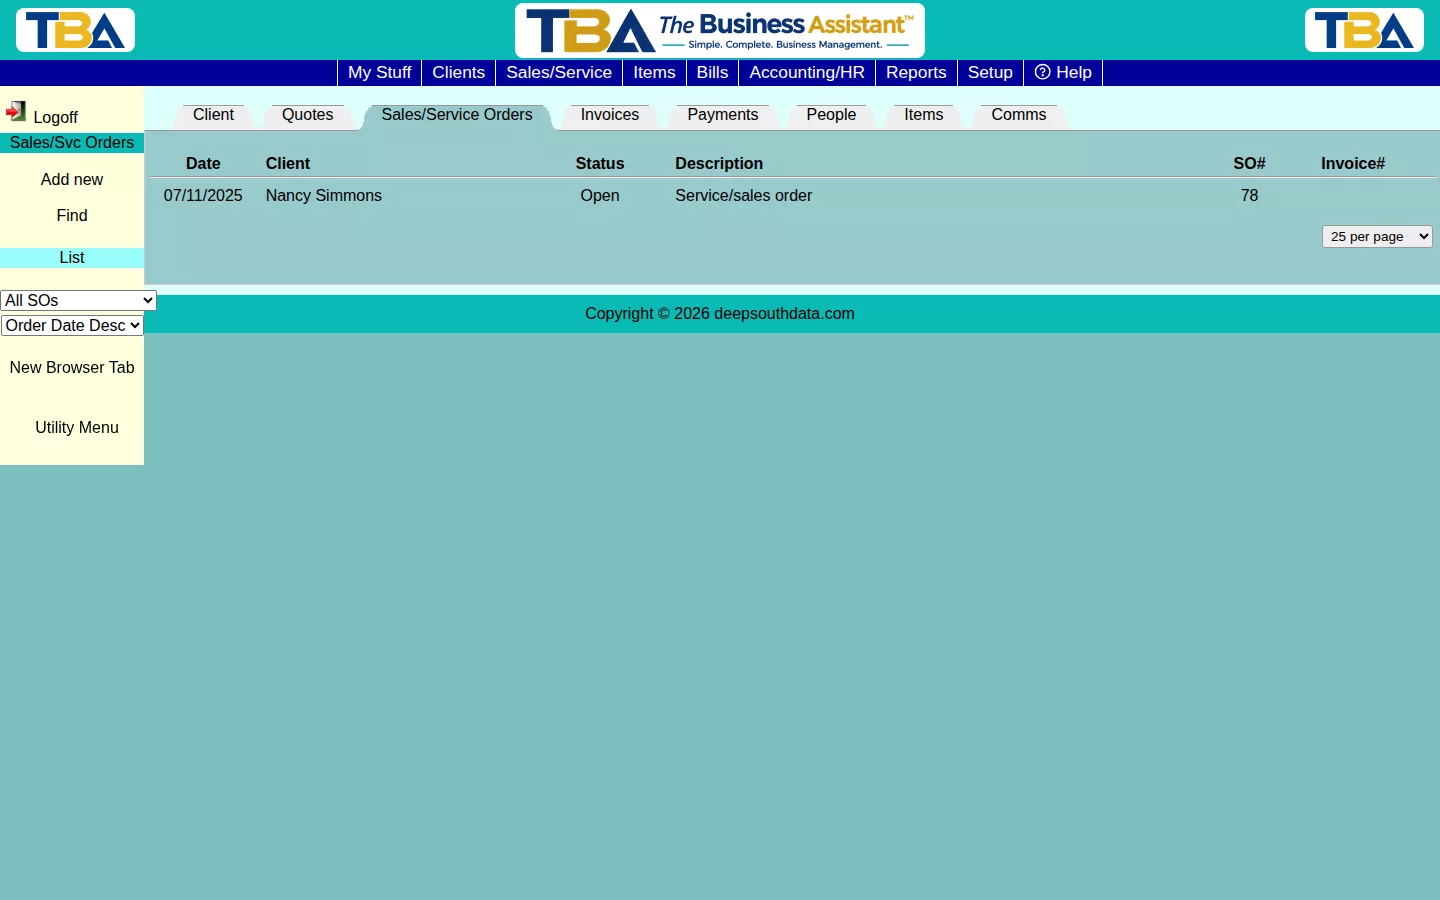
Each row shows the Date, Client, Status, Description, SO#, Total, and Invoice# (blank until the order is invoiced). Total is the order’s full amount: all of its lines plus sales tax, the same figure as Total at the bottom of the order, formatted with commas and two decimals. Click a row to open the order. The sidebar offers:
- Add new — start a new order. From the main menu you are first asked to choose the client.
- Find — search orders (see below).
- Status filter — All SOs, or a single status.
- Sort — SO Date Descending or Ascending, Status Descending or Ascending.
- New Browser Tab — opens a second TBA tab.
Finding an Order #
On the Find page, fill in any combination of: All text fields, SO number, Client, SO date from / to, and Status. Click Find; the matches appear in the list. List → List Previous Find on an order returns you to your last results.
Order Statuses #
- Open — accepted, not yet started.
- In Progress — work has begun.
- Completed — work is done and ready to bill.
- Invoiced — set automatically when you save an invoice made from the order. The order is then locked.
- Paid — available for you to choose once the client has paid. TBA does not set it for you. An order that is Invoiced or Paid is locked against ordinary edits.
- Voided — cancelled. A voided order is a closed historical record and can’t be edited.
Your company may have added its own additional statuses as well.
The Order Page #
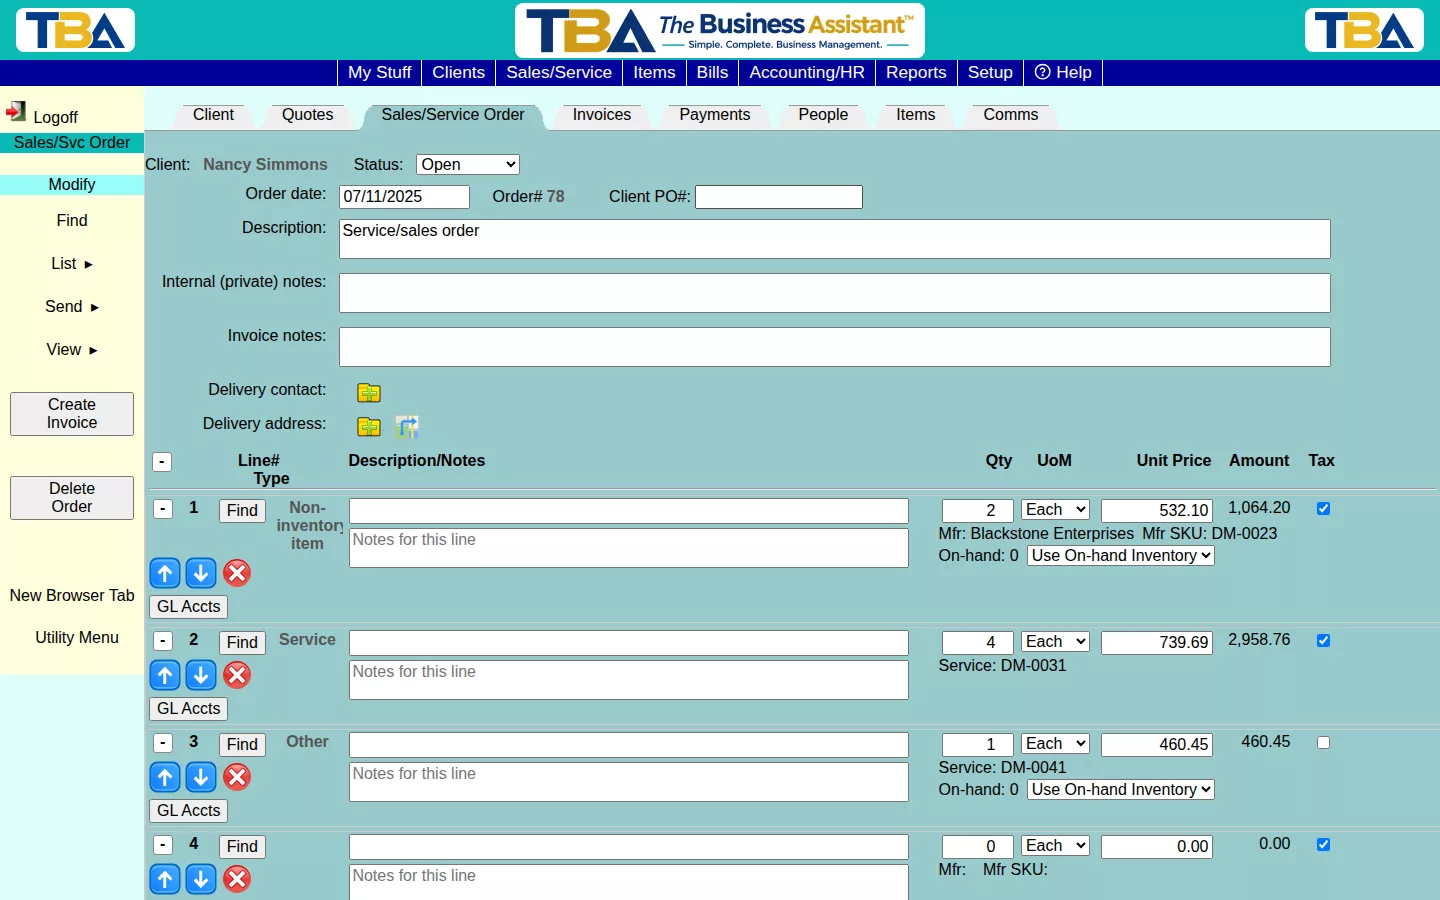
Header Fields #
- Client — who the order is for.
- Status — see above.
- Site — which site the order belongs to. Only shown if you have two or more sites.
- Prepayment — appears only when the client has paid something against this order before it was invoiced (see Client Payments). It shows the amount paid so far.
- SO date and SO# — the order date, and the number TBA assigns when you save (the next number comes from Next Numbers to Assign).
- Invoice# — appears once the order has been invoiced.
- Client PO# — the client’s purchase order number.
- Description — a short summary of the job.
- Internal (private) notes — for your team only.
- Invoice notes — notes intended for the client’s invoice.
- Delivery contact and Delivery address — choose from the client’s saved People and addresses, or add new ones on the spot. The order keeps its own copy of the address, so later edits to the client’s address list do not change an existing order.
- Void reason — appears when you set the status to Voided. Explain why the order was cancelled.
Line Items #
Lines work much as they do on a quote: Find or the Recent items list fills in the item, description, unit of measure, tax setting, and price; you adjust Qty, UoM, Unit Price, and Tax; and you can reorder lines with the arrows, delete them, or collapse/expand them. The differences on an order:
- On-hand — on Inventory lines, the quantity you currently have in stock (for the order’s site).
- Use On-hand Inventory / Special Order — choose whether the line is filled from stock or must be ordered from a vendor. A line starts as Special Order automatically when nothing is in stock. If you ask for more than is on hand, TBA keeps what is available on the line and adds a separate Special Order line below it for the rest. Special-order lines show up on Purchase Orders so you can order them, and show a Received badge once the goods have arrived. If the goods are later sent back to the vendor (see Vendor Returns) and you keep the client’s order open, the badge goes away and the line waits for the replacement. Link the line to its PO line (Sales Order Line on the Purchase Order) so TBA can tell when it has been received.
- Unit Details — see Choosing Which Unit an Inventory Line Is For below.
- Completed by — on Service lines billed by the hour or day, the person who did the work.
- Started / Ended / Elapsed — on those same time-billed Service lines, enter when the work started and ended (the clock icon fills in the current time). TBA calculates the elapsed time, and Total service time below the lines adds it all up.
- Rate type — on time-billed Service lines, applies a Service Rate Rule such as weekend, holiday, or overtime pricing. If the Started/Ended period crosses more than one rate, TBA shows a Multiple Rate Type Periods dialog when you save so the time can be priced correctly. See Service Holidays.
- GL Accts — users with permission to edit accounting see a button on each line that reveals the Revenue and Cost of Goods Sold accounts the line will post to. These default from the item and Default G/L Settings; most users never need to change them.
- Invoiced badge — shown on lines already billed.
Totals #
Sub-total, Taxable total, Sales tax code and rate, Total service time, and Total are calculated for you, the same way as on a quote. See Sales Tax. Click Save Changes to save.
Sidebar Actions #
- Send → Print/Download — makes a PDF of the order.
- Send → Email Order — pick recipients from the client’s email addresses and contacts, or type your own, then compose the message (From, subject, and a formatted body, pre-filled from your template in General Options). Every email is recorded in the Email Log.
- View → Status Changes — each status the order has had, with date, time, and who changed it.
- View → Communications — calls, emails, and meetings about this order; see Client Communications.
- View → Attachments — see Attachments and Pictures.
- View → Assigned personnel — who is responsible for the job: name, role, status, and percent. Roles come from Personnel Roles.
- View → Scheduled personnel — who is scheduled and when: start and end date and time, with the scheduled time for each person and a total. For Open and In Progress orders, scheduled time also counts on the Time Tracking Calendar.
- Create Invoice — see below.
- Delete SO — permanently removes the order and its lines. An order that has been invoiced, or that has an active prepayment, cannot be deleted; void the payment first.
Creating an Invoice #
Once the order is ready to bill, click Create Invoice in the sidebar. This opens a new Invoice pre-filled from the order’s lines, so nothing is re-entered. Nothing is actually created until you save the invoice; if you leave without saving, the order is unchanged. When you save, the order becomes Invoiced and locks. Save the order first if you have unsaved changes. Completed orders also appear in the Items to Invoice list on the Invoices page; a unit received for the client’s special order that this order will use is listed only once, not twice.
Choosing Which Unit an Inventory Line Is For #
When you pick an inventory item that is in stock, Unit Details opens automatically so you can choose the specific unit (lot) this line is for. This matters most for items with serial numbers: the unit you choose is the one that is set aside for the client, and its serial# is the one that prints on the invoice. You can also click the Unit Details button on any inventory line later.
- Every in-stock inventory line needs its unit chosen before the order can be saved. If the item has only one lot in stock (or every lot is needed to fill the quantity), TBA fills it in for you. If there is more than one choice, saving asks you to click Unit Details and pick.
- Special-order lines (items not in stock) skip this step. There is no unit to choose yet.
- Partial quantities: for a lot with a quantity greater than one, enter how many of that lot this line takes.
Set Aside for This Order #
Choosing a unit sets it aside for this SO until the order is invoiced. In Unit Details, a unit that another open order is already holding shows Set aside: SO# 12 for Client Name. The set-aside units also show on the Inventory list and lot detail. A set-aside unit can’t be returned to a vendor until it is released (see Vendor Returns).
If you choose a unit that is already set aside for another SO, TBA asks you to confirm before taking it. The override is recorded in the Audit Event Log against that lot.
A unit is released automatically when the line is deleted, the item is changed, the line is switched to a special order, or the order is voided. If an invoice is voided and the order is still open, the unit is set aside for the order again.
On a Phone #
On a phone, the order list shows each order as a card: SO#, client, and total on the first line, then status, date, and invoice number, then the description. On the order itself, the number and date appear first, then the other header fields stacked with labels above them. Each line is a card, including the On-hand / Special Order choice, Unit Details, and the Started/Ended times on service lines, followed by the totals. Sidebar actions such as Create Invoice, Email Order, and Delete are behind the actions button (three dots, top right). Read-only order views (the pop-up opened from elsewhere) also use cards. See Using TBA on Your Phone.


